| |
|
Multi-layered image generation
|
| |
|
| |
|
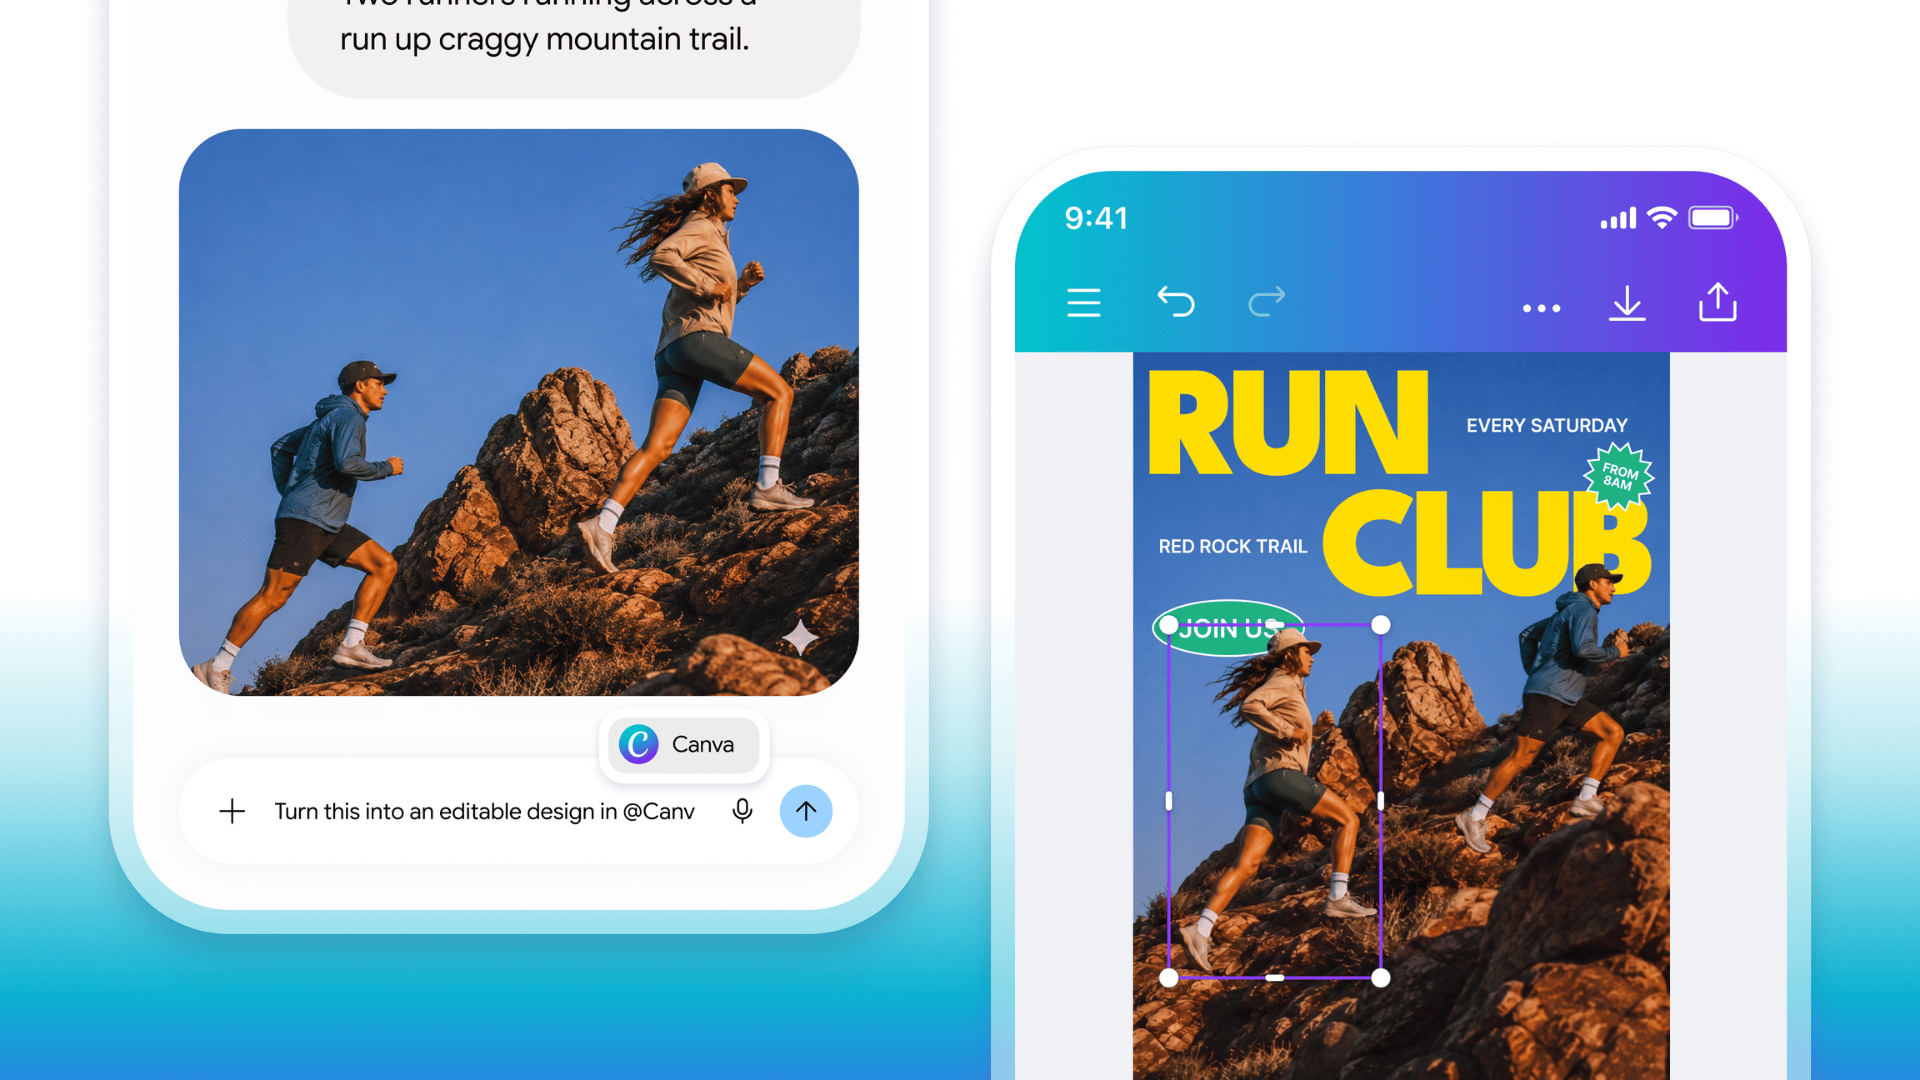
Last week, image generation went from single flat outputs to multi-layered, using Canva Magic Layers.
|
| |
|
A month ago, inline editing launched inside ChatGPT: a select tool that lets you highlight one region of an image and change only that part. This week it's Canva's Magic Layers, now built into ChatGPT (and Gemini, Claude, and Copilot). You type one command and Canva's model rebuilds your flat image as a fully layered design: the text becomes real text you can retype, every object becomes its own selectable element, the background sits on its own layer.
|
| |
|
Put simply: for the first time, the image you generated is a starting point, not a finished thing you're stuck with. You can edit what exists instead of rolling the dice on a fresh generation.
|
| |
|
What you need
|
| |
✓ A ChatGPT account
✓ A paid Canva subscription for the editing. The conversion is free to trigger; the editing happens inside Canva.
|
|
| |
|
What's still rough
|
| |
|
⚠ The layers are reconstructed by a model. A clean, simple image splits beautifully. A busy, text-heavy collage probably won't.
|
|
| |
|

|
| |
|
Method 1: The 10-second fix (ChatGPT magic select)
|
| |
|
| |
|
Use this when you like the image and need to change exactly one thing.
|
| |
|
Step 1: Open the image in ChatGPT's edit mode. You'll get a select tool, the blue highlight, that lets you paint over a region.
|
| |
|
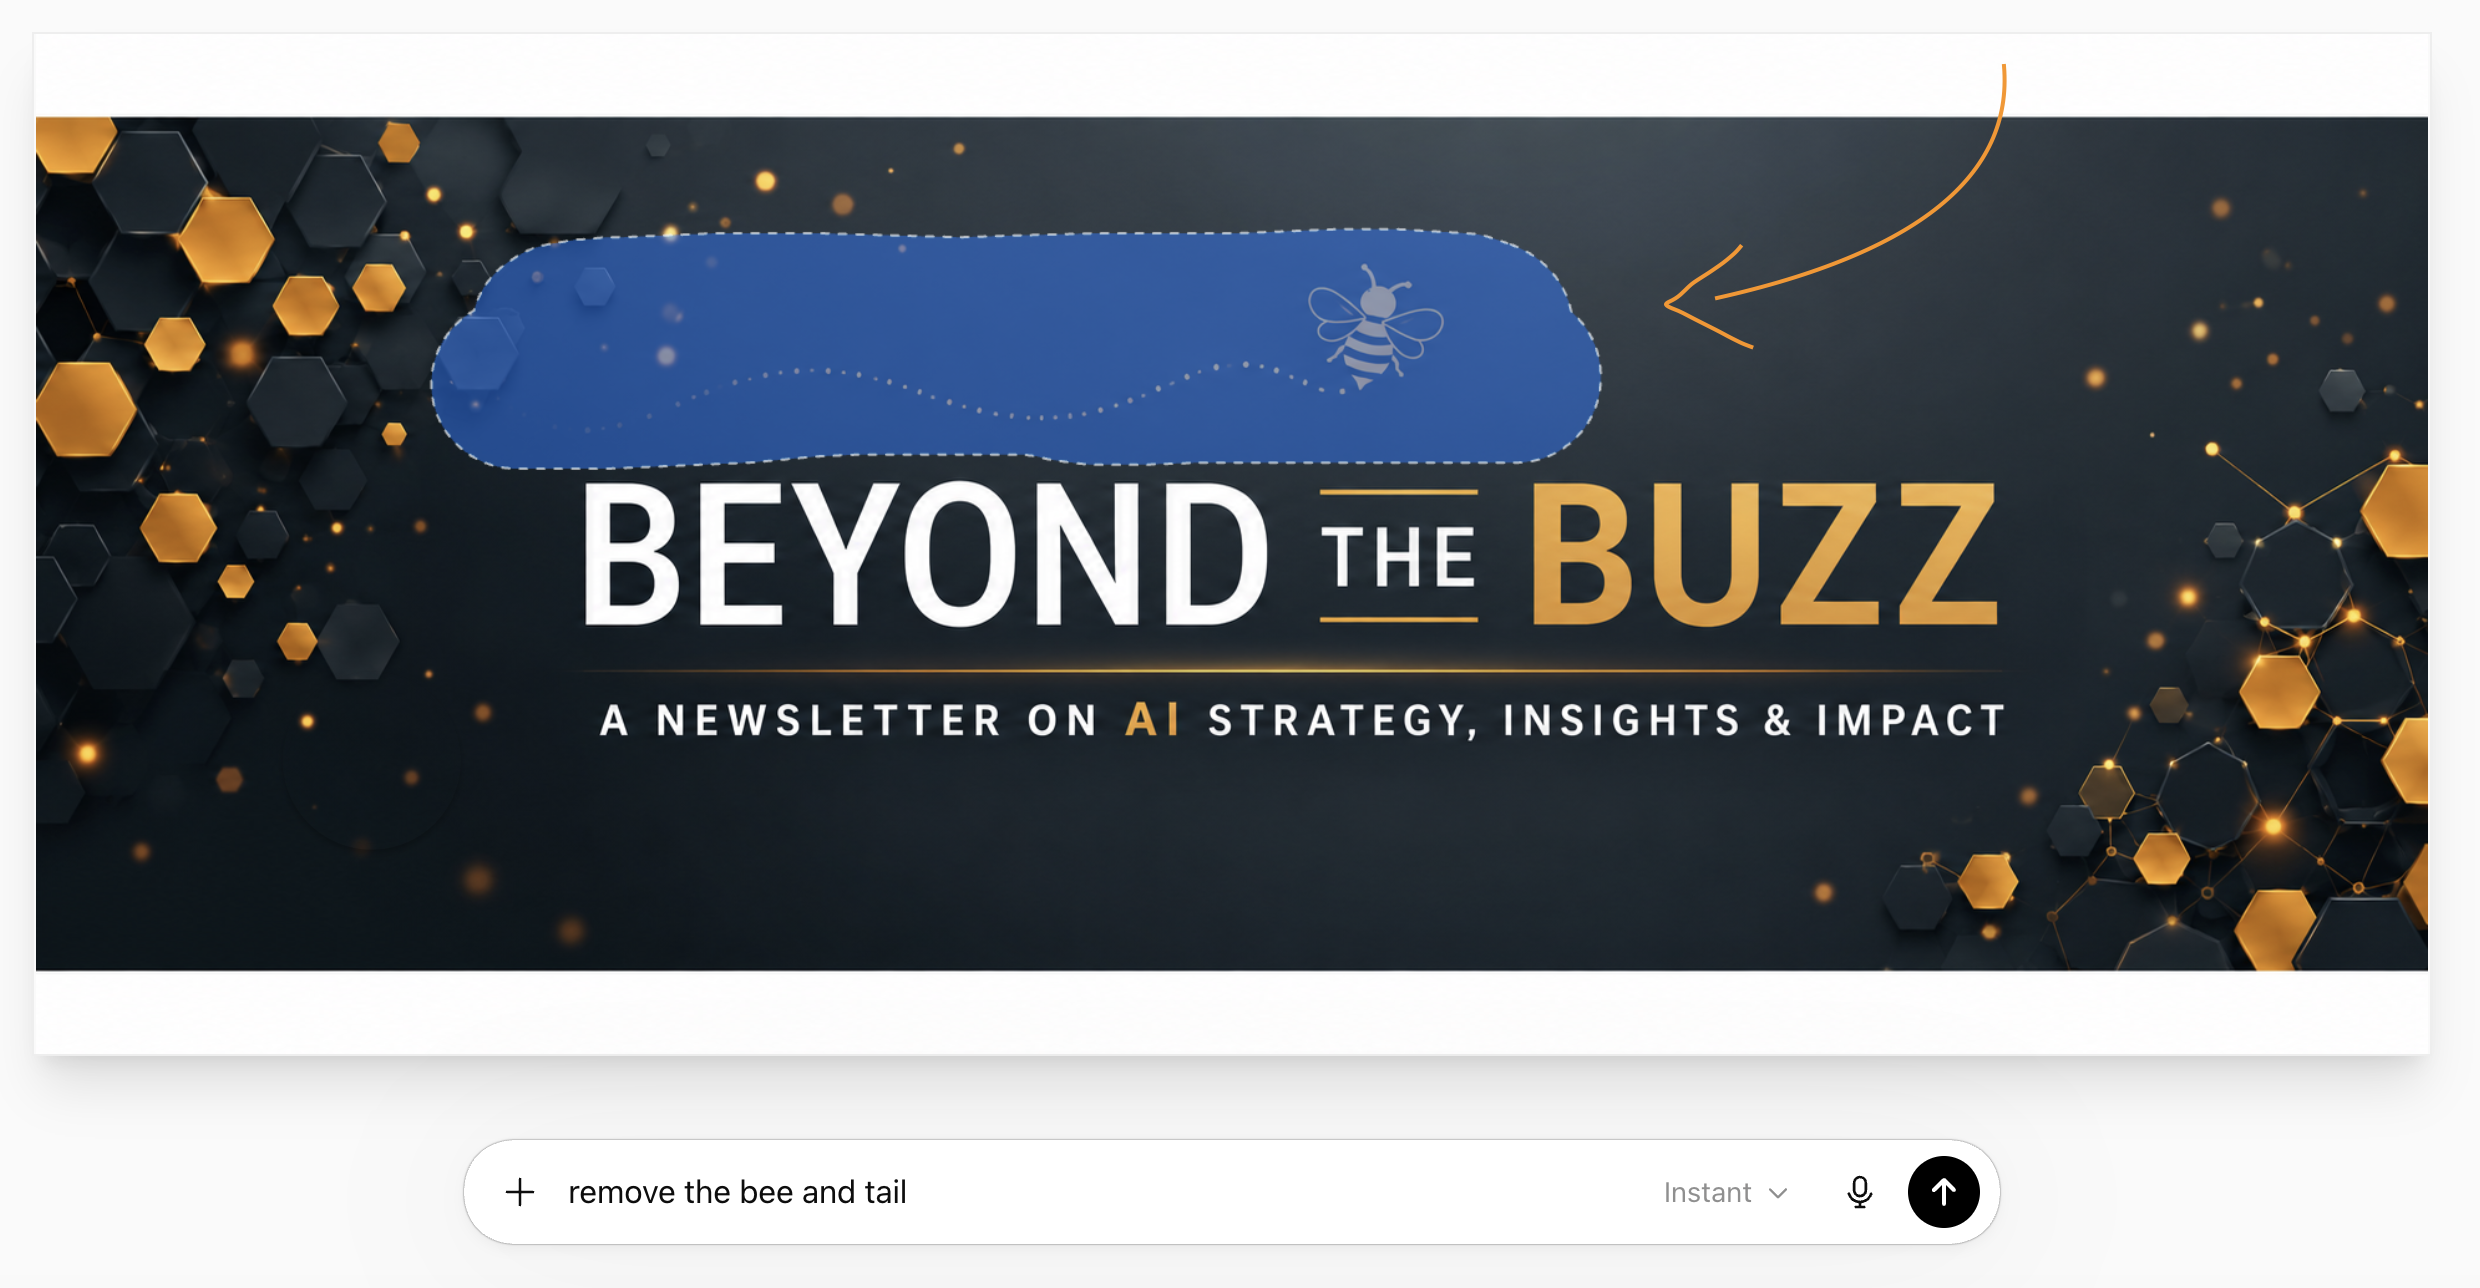
Step 2: Brush over the thing you want gone or changed. The bee, in my case. You're telling the model the exact area to touch, and that's the whole trick. Scope it tight and it leaves the rest of your image alone.
|
| |
|
Step 3: Say what you want. "Remove this." "Delete the bee." It regenerates only inside your selection and blends the new pixels back into the surrounding image.
|
| |
|
Pro tip: Select a little wider than the object itself. That gives the model room to rebuild the background behind it instead of leaving a smudge at the edges.
|
|
| |
|
Watch out: This changes pixels, not structure. You can't pull the bee out onto its own layer, move it, or recolor it independently later. For "fix one thing," nothing is faster. For "rework the whole layout," that's method 2.
|
|
| |
|
|
|
| |
|
Method 2: The full rebuild (@Canva editable design)
|
| |

|
| |
|
Use this when the image needs to become a real asset: on-brand, resizable, properly editable.
|
| |
|
Step 1: Ask Canva to take over. In ChatGPT, with your image in the chat, type:
|
| |
|
@Canva turn this into an editable canva design
|
|
| |
|
The first time, you'll connect your Canva account, or just prompt @Canva to connect and follow the steps.
|
| |
|
Step 2: Give it about 2 minutes. Canva's model reads the image and rebuilds it as a layered design. Text becomes live text. Objects become separate elements. The background gets its own layer.
|
| |
|
Step 3: Open it in Canva. Click Customize (or Open in Canva) and the whole thing lands in the full Canva editor, exactly as if you'd built it there by hand.
|
| |
|
Step 4: Edit like it's yours, because now it is. Retype the headline. Recolor to your brand. Drag an element to a new spot and watch the background fill in behind it. Resize the same design for a social square, an email banner, a print flyer.
|
| |
|
Pro tip: This is where a Canva brand kit earns its keep. Once the image is layered, you apply your fonts and colors in 2 clicks instead of eyeballing a match.
|
|
| |
|
Watch out: Paid Canva only. And the cleaner your source image, the cleaner the layers. A simple composition rebuilds almost perfectly; a dense one with lots of small text is where it gets messy. Check the layers before you start editing, not after.
|
|
| |
|
|
|
| |
|
When to use which
|
| |
|
Here's the whole decision in one line:
|
| |
|
Changing something in the image? Method 1. Turning the image into an asset? Method 2.
|
|
| |
|
The bee removal took 10 seconds, header shipped, done. If I'd needed that same image as a header, a LinkedIn post, and a printable flyer with editable text, that's method 2 every time. One generation becomes five assets instead of five separate gambles.
|
| |
|
|
|
| |
|
How this all connects
|
| |
|
For two years the story was the same on every tool: the generation got jaw-dropping, and then you hit a wall the second you needed a small change.
|
| |
|
The flat file was where momentum died.
|
|
| |
|
You either lived with the flaw or paid the regenerate-from-scratch tax and hoped the next generation kept the good parts. Most of the actual work, the part that's yours, happens after the first draft of anything. Images were the one place you couldn't do it.
|
| |
|
That's the wall that just came down, and it came down across tools at once. The same editable-layers move works whether you generate in ChatGPT, Gemini, or Claude.
|
| |
|
|
|
| |
|
Try this now
|
| |
|
Pick one image you generated and gave up on because of a single flaw. Drop it into ChatGPT, grab the select tool, brush the flaw, and tell it what you want instead. 30 seconds.
|
| |
|
Then, if you've got Canva, take a second image and run:
|
| |
|
@Canva turn this into an editable canva design
|
|
| |
|
Open it in Canva and change the headline text to something of yours. That's both moves in about 5 minutes total, and the next time an AI image is 90% right, you'll fix the 10% instead of starting over.
|
| |
|


